Product Bundling & BOGO cheat sheet
This article is discontinued and won’t receive any further updates. Visit Product bundles to view its new version.
Overview
This article will explore the most popular ideas for product bundles and Buy One Get One (BOGO) campaigns. A bundle is a group of products, services, or features offered together as a single package. Bundles are often priced lower than the total cost of purchasing each item separately. In Voucherify, bundles work with cart promotions, generic codes, and unique codes.
The Bundle Multiplication feature multiplies discounts or limits based on the number of bundles in the cart.
Contents
Glossary
Bundle
A bundle is a group of products, services, or features offered together as a single package. Bundles are often priced lower than the total cost of purchasing each item separately.
Bundled Items
Bundled items are the individual products or services that make up a bundle. When a customer buys all required bundled items together, they become eligible for the bundle discount or reward.
Minimum Quantity of Products
The minimum quantity of products defines how many items must be included in the bundle for it to qualify for the promotion. If the customer adds fewer items than the minimum, the bundle discount doesn’t apply.
Maximum Number of Eligible Bundles
The maximum number of eligible bundles sets a cap on how many bundles can be counted in a single order. This limit controls how many times the bundle discount can apply per transaction.
Item Discount Limit
We recommend setting an item discount limit in:
- Amount discount: Apply the full discount to each item unit,
- New price: Apply the discount to item unit,
- Upgrade Bonus: Replace order items.
Without the limit, each eligible unit receives the discount, regardless of how many bundles are in the order. By default, Voucherify automatically assigns the item discount limit for the discounted items to 1.
Discount Categories
Buy X, get Y for free
Free products: Add missing order items to match total discount units count
This type adds only the missing free products. It will match the total defined maximum number of eligible bundles limit.
Example:
Buy 1 laptop → get 1 laptop bag free.
Buy 2 laptops → get 2 laptop bags free to reach the required total.
Result:
The number of free products is multiplied by the number of bundles.
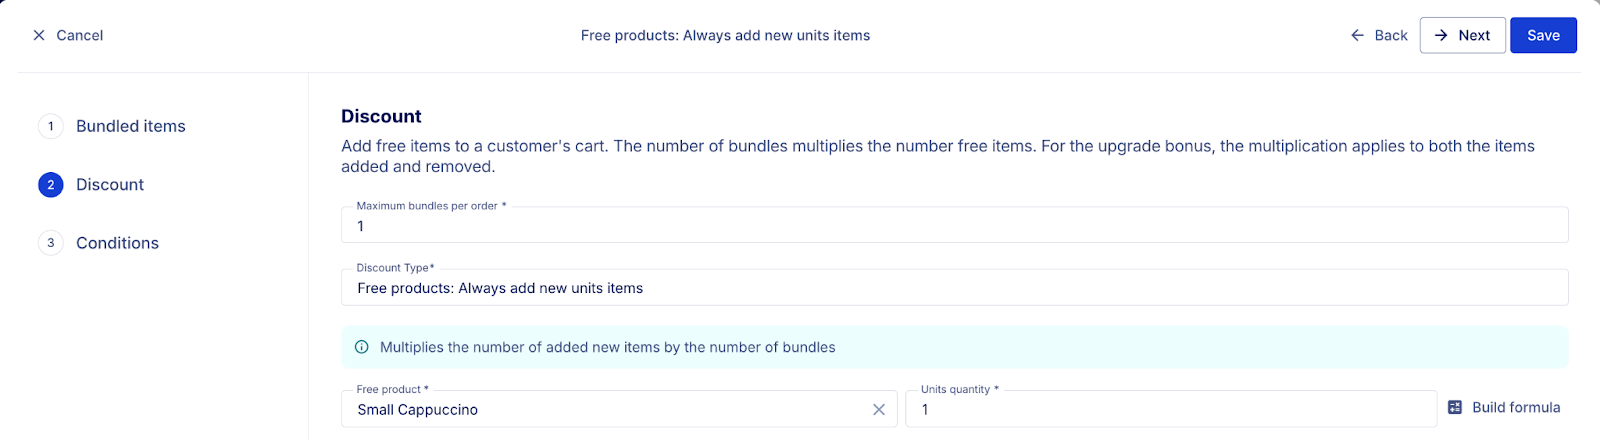
Free products: Always add new units items
This type always adds new free products. It ignores whether the same product already exists in the cart.
Example:
Buy 1 pair of shoes → get 1 pair of socks free.
Buy 3 pairs of shoes → get 3 pairs of socks free, regardless of existing ones.
Result:
The number of newly added free products is multiplied by the number of bundles.
Free products: Add many order items
This type adds multiple free products at once when several bundles are qualified.
Example:
Buy 1 pizza + 1 cola → get 2 free desserts.
Buy 2 pizzas + 2 colas → get 4 free desserts.
Result:
All free products are multiplied by the number of bundles.
Upgrade Bonus: Replace order items
This type replaces existing products with upgraded ones. The multiplication applies to both the added and removed items.
Example:
Buy 1 small coffee → upgrade to 1 large coffee.
Buy 3 small coffees → upgrade to 3 large coffees.
Result:
The number of replaced and added products is multiplied by the number of bundles.
Discount Whole Order
Amount Discount: Apply to Whole Cart
This type applies a fixed amount discount to the entire cart. The discount value is multiplied by the number of bundles.
Example:
$1 discount per bundle (lip balm + hand cream)
5 × lip balms + hand creams → $5 off the whole cart.
Result:
The discount value is multiplied by the number of bundles and applies to the cart total.
Percent Discount: Apply to Whole Cart
This type applies a percent discount to the entire cart. The percentage value is multiplied by the number of bundles.
Example:
5% discount per bundle (cleaning spray + microfiber cloth)
5 × cleaning sprays + microfiber cloths → 25% off the whole cart.
Result:
The percentage discount value is multiplied by the number of bundles and applies to the entire cart.
New Price: Apply to Whole Cart
This type applies a fixed total price for the cart. The discount value is not multiplied.
Example:
New total cart price: $50 per bundle (phone case + screen protector)
5x phone cases + screen protectors → $50 total, not multiplied.
Result:
The discount value is not multiplied by the number of bundles. The total fixed price applies once to the entire cart.
Discount bundle items by fixed amount
Amount discount: Apply the full discount to each item unit
This type applies a full discount to each item unit. The number of discounted units is multiplied by the number of bundles. By default, Voucherify automatically assigns the Maximum eligible units per order item limit to 1. Without a limit, each eligible unit receives the discount, regardless of how many bundles are in the order.
Example:
Laptop + bag, get $20 off for a single mouse
Cart 1 – Limit Set
Bundle: Laptop + Bag
Discounted product: Mouse collection
Discount rule: Maximum eligible units per order item limit set to 1
Cart contents:
Laptop × 2
Bag × 2
Mouse × 3 – $40 total
Explanation:
The cart contains two complete bundles (Laptop + Bag × 2). Each bundle qualifies for one discounted mouse because the discount limit is set to one per bundle. Only two mice receive the discount, giving the customer a total discount of 2 × $20 = $40. The third mouse remains at full price.
Cart 2 – No Limit Set
Bundle: Laptop + Bag
Discounted product: Mouse collection
Discount rule: No maximum eligible units per order item limit set
Cart contents:
Laptop × 2
Bag × 2
Mouse × 3 – $60 total
Explanation:
The cart again includes two complete bundles (Laptop + Bag × 2). Because there is no limit on the number of discounted items, all three mice receive the discount, so it’s $60 in total. The rule applies to every matching product in the cart, not just one per bundle.
Result:
The discount value remains the same per unit item. The number of max discounted units is multiplied by the number of bundles.
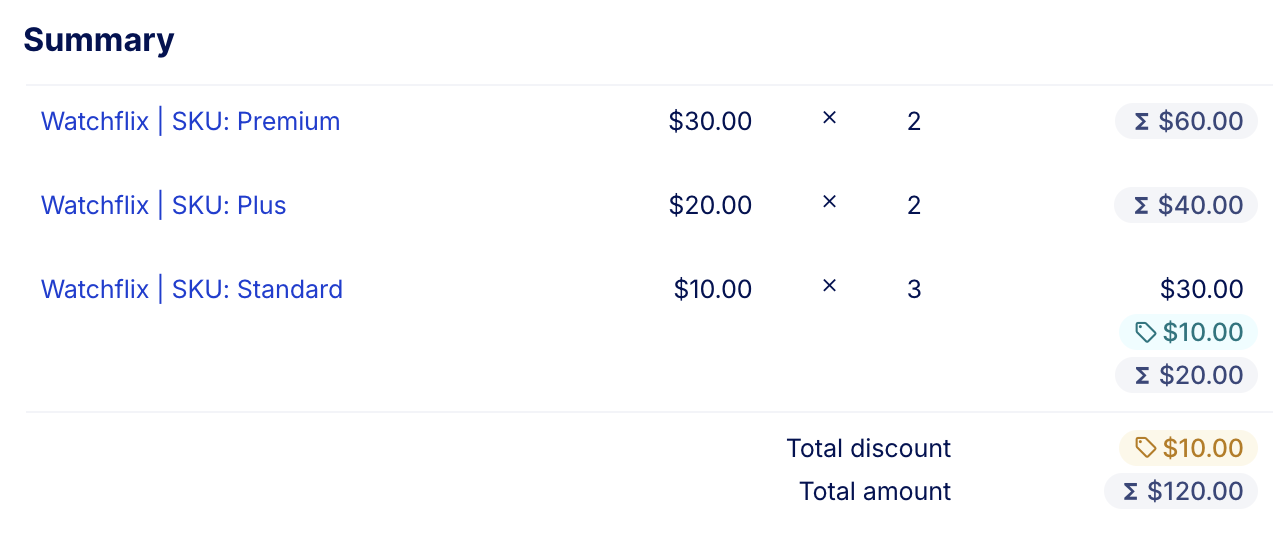
Amount discount: Apply the discount to item subtotal
This type applies a fixed discount to the subtotal of each targeted product. The discount value is multiplied by the number of bundles.
Example:
Bundle: Laptop + bag, get $20 off for a mouse collection product
Cart 1 – Combined Mouse Order Line
Bundle: Laptop + Bag
Discounted product: Mouse collection
Discount rule: $20 for each bundle
Cart contents:
Laptop × 2
Bag × 2
Mouse × 3 (one order line) $40 discount
Explanation:
The cart includes two complete bundles (Laptop + Bag × 2), making the customer eligible for a $40 subtotal discount. Because all three mice are grouped in a single order line, the discount is applied once to that line’s subtotal.
Cart 2 – Split Mouse Order Lines
Bundle: Laptop + Bag
Discounted product: Mouse collection
Discount rule: Subtotal discount applies separately to each order line
Cart contents:
Laptop × 2
Bag × 2
Mouse × 1 $40 discount
Mouse × 1 $40 discount
Mouse × 1 (three separate order lines) $40 discount
Explanation:
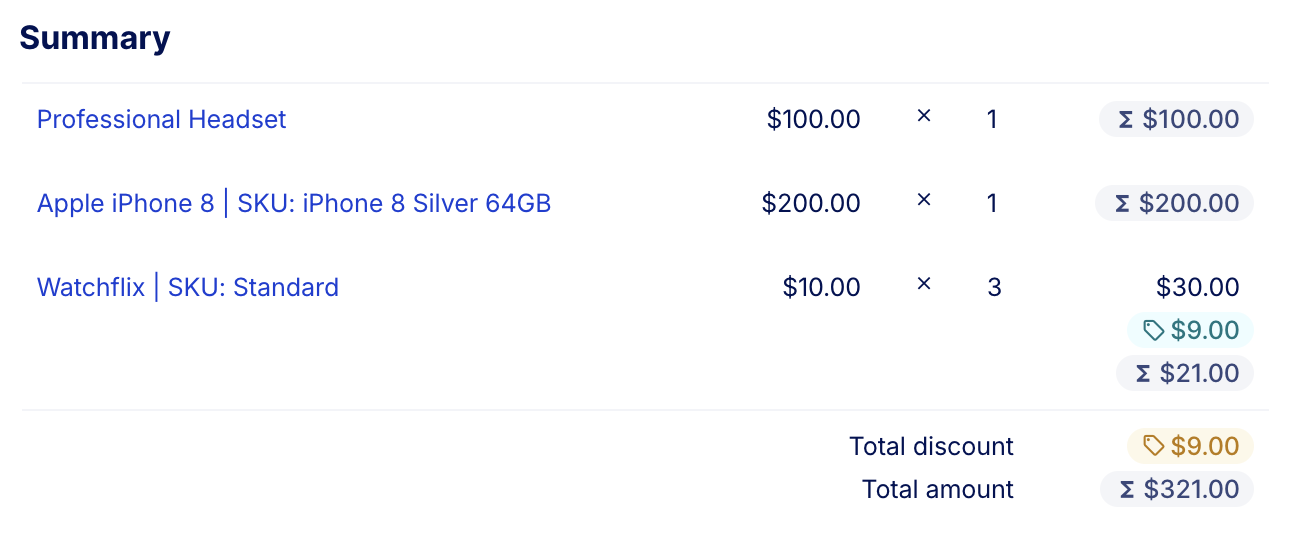
The cart again includes two complete bundles (Laptop + Bag × 2). Because each mouse is on a separate order line, the discount is applied individually to each line. Each mouse line receives a $40 discount, resulting in a total of $120 off. Splitting items into separate order lines increases the total discount amount. ⚠️
Result:
The discount value is multiplied by the number of bundles and applied to the subtotal of each targeted item.
Discount percentage off bundle items
Percent Discounts (Item Level)
This type applies a percentage discount to targeted items. The discount percent is multiplied by the number of bundles.
Example:
5% per bundle (2 packs of crisps)
4x packs of crisps → 10% off all soda drinks in the targeted collection.
Result:
The discount value is multiplied by the number of bundles. The maximum number of discounted units is not multiplied.
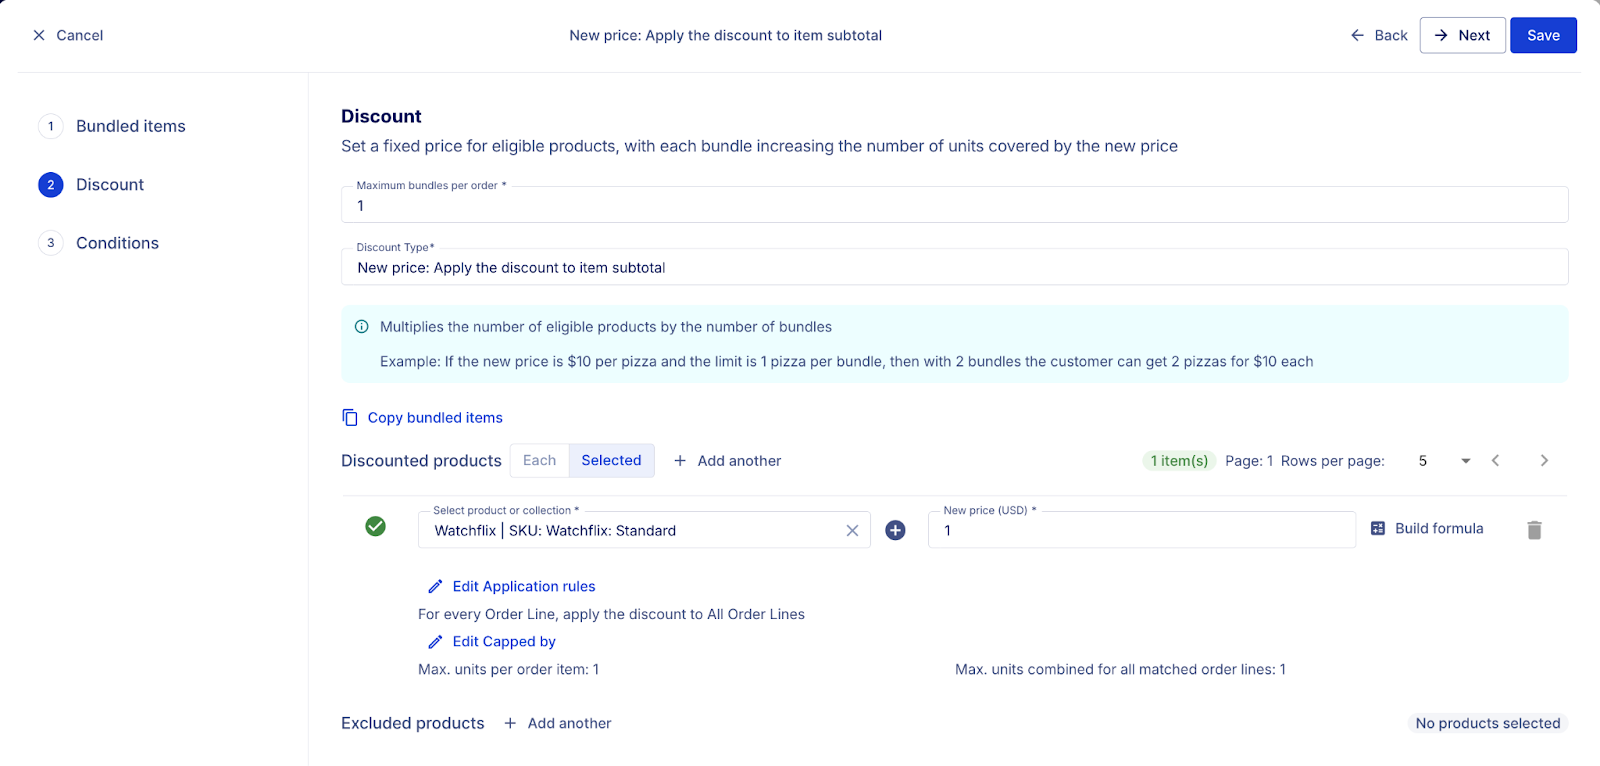
Set price for bundle items
New price: Apply the discount to item unit
This type sets a new price for selected items. The value does not multiply, but the number of affected items multiplies by the number of bundles.
Example:
Set price: $10 per ticket, $2 per drink
Maximum eligible units per order item limit set to: 1 ticket and 2 drinks per bundle.
2 bundles = up to 2 tickets at $10 and 4 drinks at $2 discounted.
Result:
The discount value is not multiplied by the number of bundles. The number of affected products is multiplied by the number of bundles.
Split discount between bundle items
Amount discount: Split the discount proportionally to amount
This type splits the discount proportionally based on the subtotal of each item. The discount value is multiplied by the number of bundles.
Example:
Bundle: Coffee Machine + Grinder
Discounted products: Coffee Beans + Filter Pack
Cart contents:
Coffee Machine × 2
Grinder × 2
Coffee Beans – $30 (60% of the discounted amount)
Filter Pack – $20 (40% of the discounted amount)
Explanation:
The discount is $10 per bundle. With two bundles, the customer gets $20 off in total. The discount is split proportionally — Coffee Beans receive $12 (60%) and the Filter Pack receives $8 (40%).
The allocation is based on the subtotal of all targeted order line items, not just the items within a single bundle.
Result:
The discount value is multiplied by the number of bundles and split proportionally across the targeted order line items based on their subtotal value.
Amount discount: Split the discount proportionally to quantity
This type splits the discount proportionally by product quantity. The discount value is multiplied by the number of bundles.
Example:
Bundle: Tennis Racket + Sports Bag
Discounted products: Tennis Balls + Wristbands
Cart contents:
Tennis Racket × 2
Sports Bag × 2
Tennis Balls × 3 (60% of the discounted quantity)
Wristbands × 2 (40% of the discounted quantity)
Explanation:
The discount is $10 per bundle. With two bundles, the customer qualifies for a $20 total discount. The discount is split based on quantity — Tennis Balls (3 units) receive $12 (60%), and Wristbands (2 units) receive $8 (40%).
Result:
The discount value is multiplied by the number of bundles and split proportionally by quantity.
Bundle scenarios
This section provides sample bundle configurations. Each scenario shows how specific bundle rules and discounts work in practice.
Included scenarios:
- Scenario 1 – BOGO: Buy one, get one free
- Scenario 2 – BOGO with value limit: Buy X, get Y for free up to $100
- Scenario 3 – Collection-based offer: Buy 5 items, get the cheapest one free
- Scenario 4 – Mixed product offer: Buy A and B, get C for $1
Use these examples to understand how different discount types and bundle conditions are applied in the system.
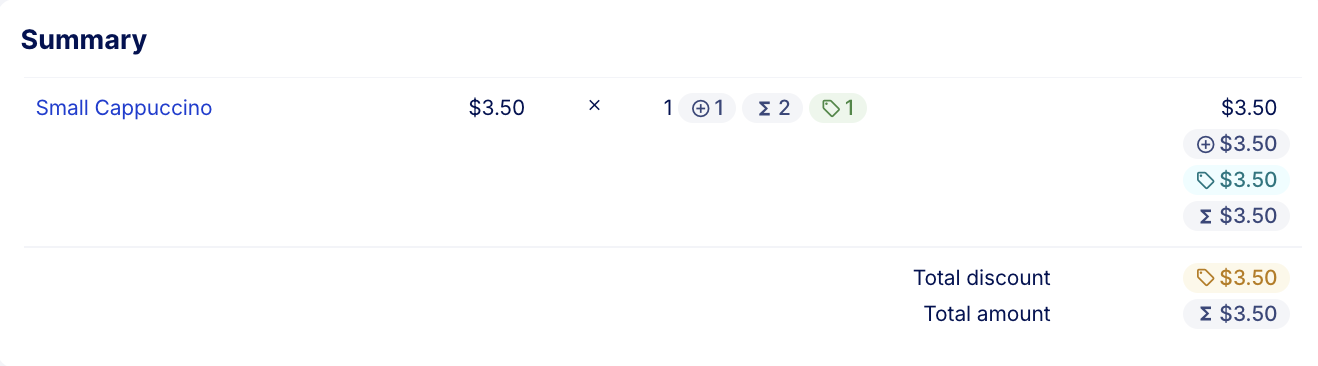
Scenario 1 – BOGO: Buy one, get one free
In this BOGO use case, if a customer has one product in the cart, the second one is added to the cart for free when using a coupon.
Create a discount coupon campaign with the following discount configuration.
Discount value
In the Discount value step, select Add discount and choose Bundles -> Buy X, get Y for free.
Add the product that the customer must have in their cart. In this case, it will be a Small Cappuccino and set the minimum quantity of products to 1.

Discount effect
Choose Free products: Always add new units items. This way, during redemption, Voucherify adds items to the cart in the number defined by the unit quantity. Select Small Cappuccino again, and set the unit quantity to 1.
Once set up, save the campaign.
Discount redemption
When a customer makes a purchase with a unique discount code, Voucherify checks the cart against the applied settings. If all conditions are met, the discount is applied to the customer's order. The discount value is equal to the price of the free item attached to the discount code.
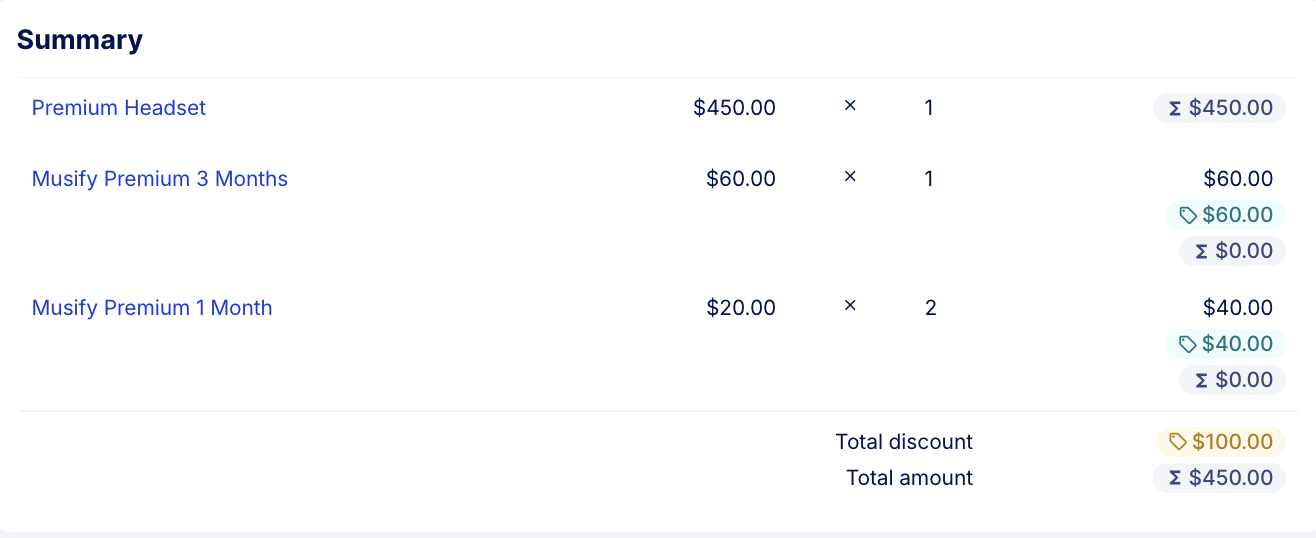
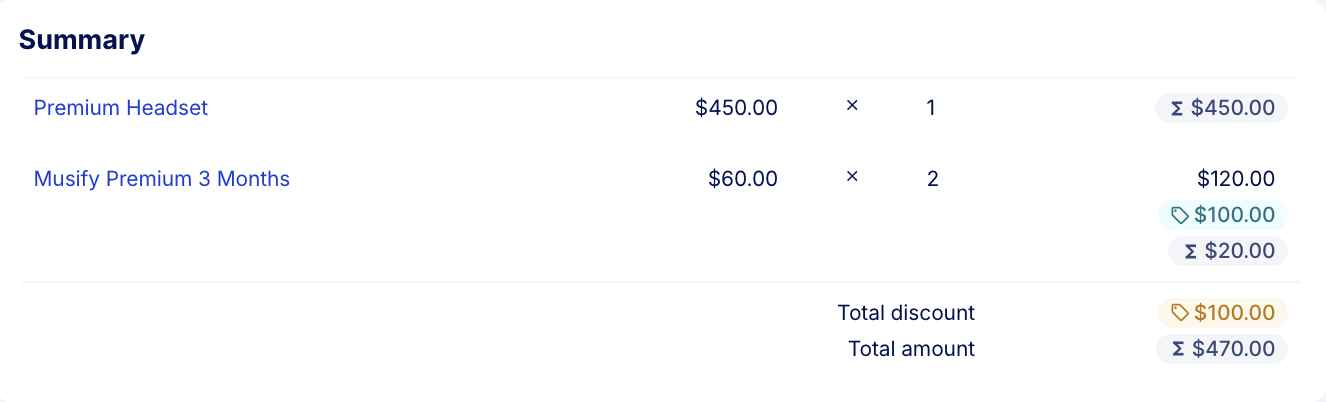
Scenario 2 – BOGO: Buy X, get Y for free up to $100
In this scenario, if a customer has at least one product from a particular product collection in the cart, products from another collection are purchased for free. Customers can have many discounted products in the cart, but their subtotal can’t be more than $100. The customer needs to add at least one product from one collection to the cart. Therefore, if a customer adds products from the second collection to the cart, they will be purchased for free with the discount code up to $100 worth of discounts.
Create a discount coupon campaign with the following discount configuration.
Discount value
In the Discount value step, select Add discount and choose Bundles -> Discount percentage off bundle items.
Select the product collection you want to be included in the order bundle. In this case, it will be an Audiophile Zone collection and set the minimum quantity of products to 1.

Discount effect
Choose Product discount -> Percent discount: Apply discount to item subtotal. Set the percent of discount to 100% and the maximum discount amount to $100. Then, choose the collection that is going to be discounted. In this case, it will be Musify Premium.
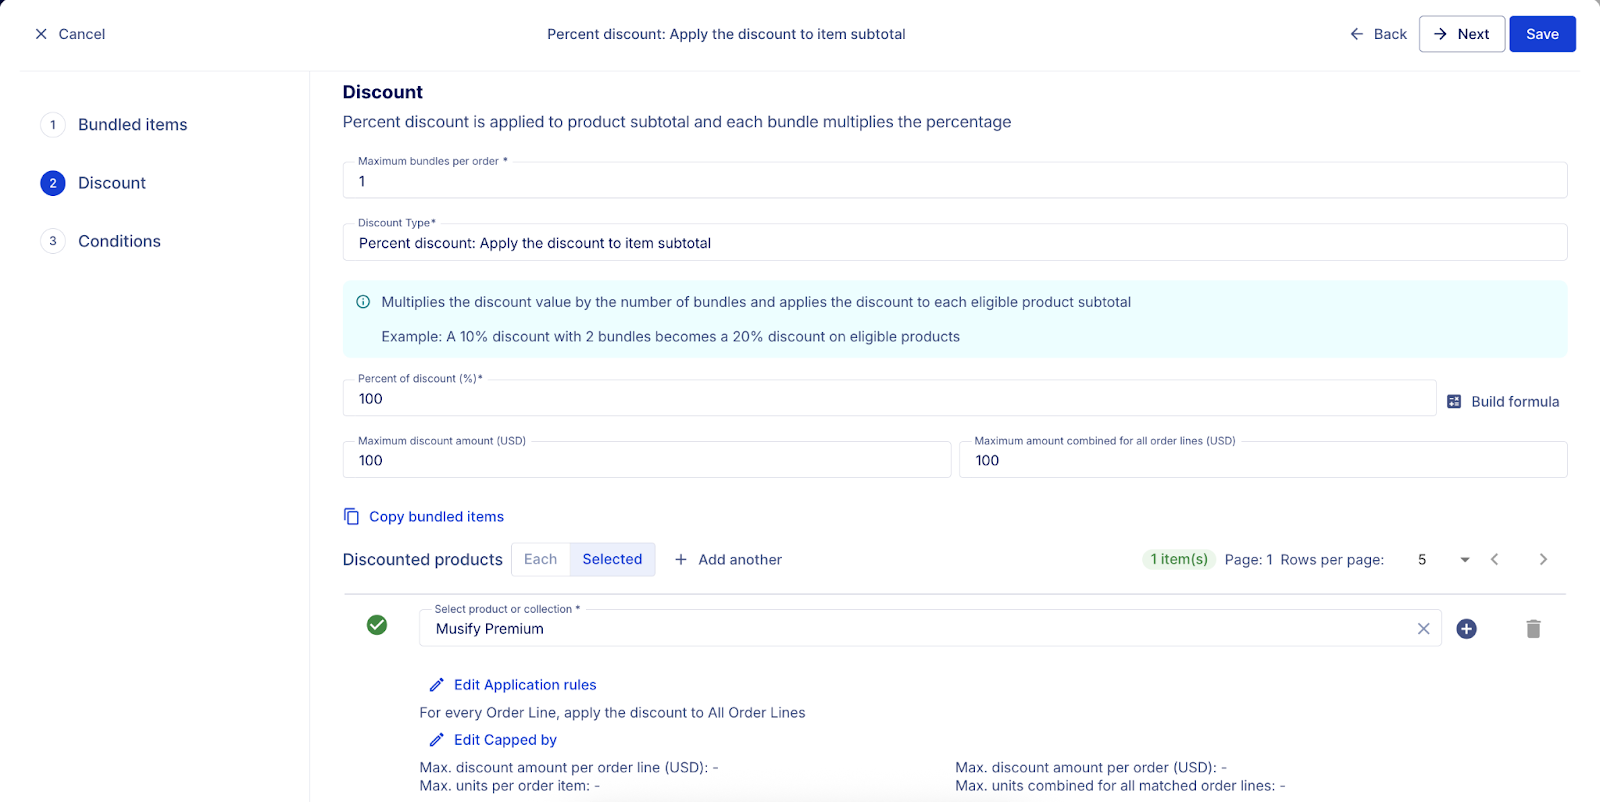
Once set up, save the campaign.
Discount redemption
When a customer makes a purchase with a unique discount code, Voucherify checks the cart against the applied settings. If the order item meets the criteria for discounted products, the code is applied, and the item is purchased for free (100% discount). At the same time, Voucherify ensures that the discount value will not exceed $100 even if the amount for discounted products is higher.
Scenario 3 – Buy 5, get the cheapest one for free – products within a specific collection
In this product bundle use case, if a customer has at least 5 items in the cart from a product collection, one of the products from the collection is given for free.
Create a promotion campaign with the following discount configuration.
Discount tier
In the Discount tier step, create a new tier and add a name. In the second step, select Add discount and choose Bundles -> Set price for bundle items.
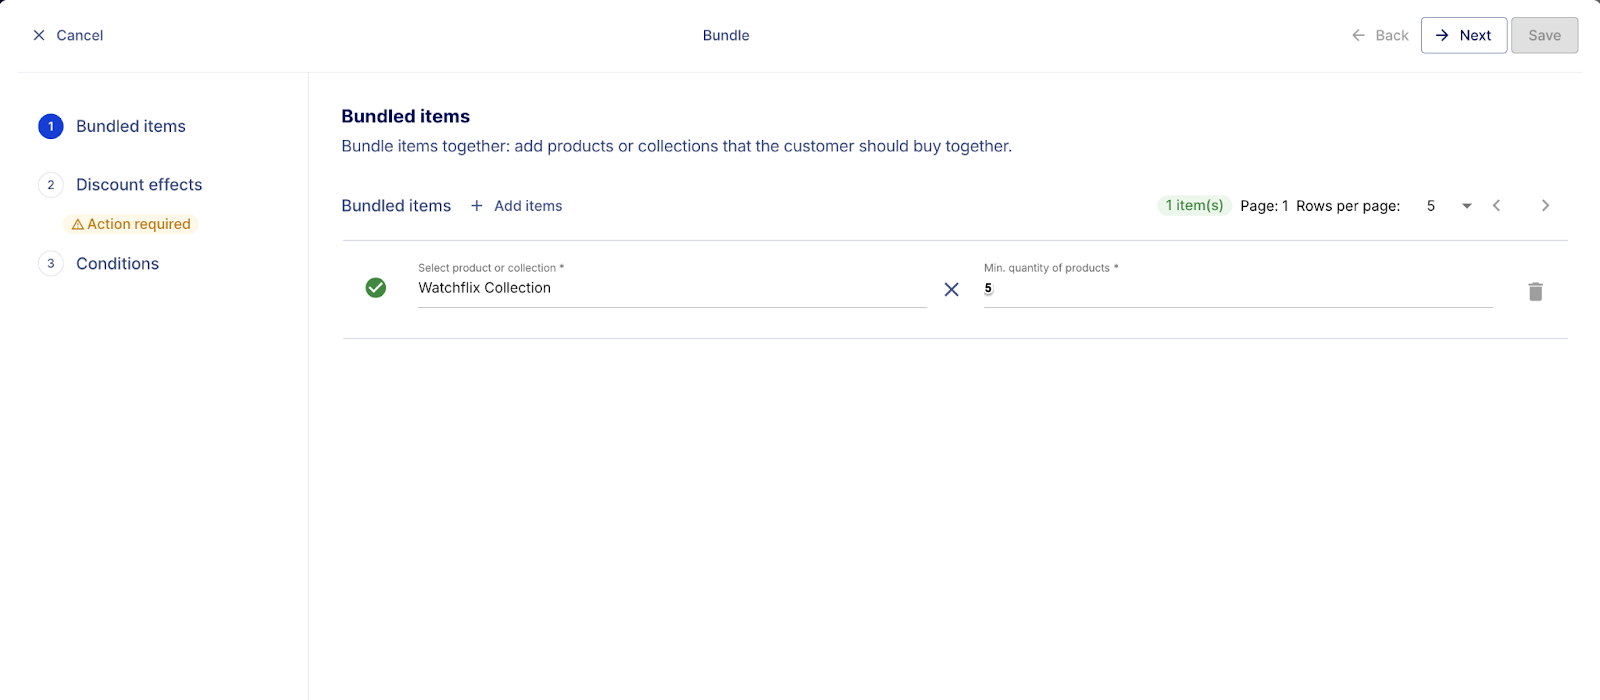
Add all the products that should be bundled together and define their quantity.
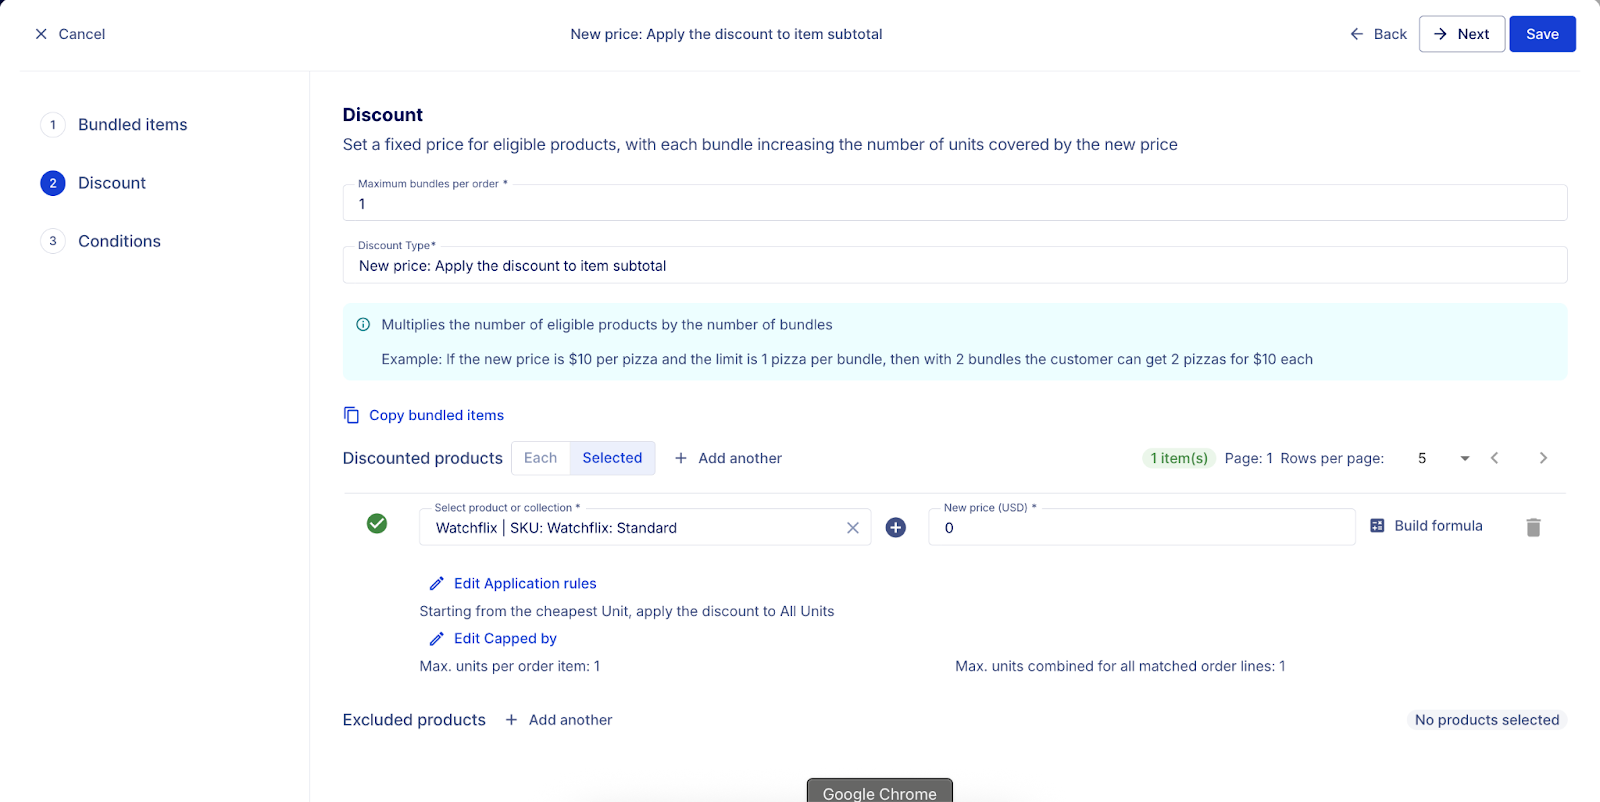
Discount Effect
Choose New price: Apply the discount to item subtotal. In this step, set the product collection from which an item will be discounted alongside the new price ($0). Cap the discounted item to 1 per max units per order item and 1 per max units combined for all matched order lines. The last thing to set is an application rule. Set the effect to ‘Starting from the cheapest’ and for the target, set ‘Unit’.
Once set up, save the campaign.
Discount redemption
When a customer makes a purchase with an active promotion, Voucherify checks the cart against bundle validation rules. If all conditions are met, the discount is applied to the customer's order.
Scenario 4 – Buy A and B, get C for $1
In this product bundle use case, if a customer has two different products, A & B in the cart, product C is discounted to $1. Customers can have many discounted products in the cart, however, the discount will apply only once. At checkout, Voucherify checks if at least three predefined items are in the customer's cart. If the customer has at least these three items added, Voucherify discounts item C to $1.
Create an in-cart promotion with the following discount configuration.
Discount tier
In the Discount tier step, create a new tier and add a name. In the second step, select Add discount and choose Bundles -> Set price for bundle items.

Add all the products that should be bundled together and define their quantity.
Discount Effect
Choose New price: Apply the discount to item subtotal. In this step, set the product that will be discounted, along with its new price. Cap the discounted item to 1 per max units per order item and 1 per max units combined for all matched order lines.
Once set up, save the campaign.
Discount redemption
When a customer makes a purchase with an active promotion, Voucherify checks the cart against the bundle validation rule. If all conditions are met, the discount is applied to the customer's order.