WooCommerce
In this tutorial, we are going to guide you through the installation and configuration of a Voucherify <> WooCommerce plugin. Then, you'll see how to use it to leverage Voucherify coupons and cart-level promotions on your WordPress site.
Contents
- Supported features
- Install the plugin
- Configure the plugin
- Use Voucherify coupon codes
- Synchronization
- Use Voucherify in-cart promotions
- Track performance
- WooCommerce Custom Snippets
Supported features
Before you start creating promo campaigns for your WooCoommerce audience, please read the below summary of Voucherify features that we support in the plugin and make sure your use cases are covered.
| Features |
|
Unit discount
Checkout
When it comes to applying the discount, a customer needs to add a free item in the required number to the cart in order to get a discount. The discount will equal the price of the item multiplied by the number defined by the unit discount. For example, if a coupon code gives 1 item X for free, a customer that has item X in the cart and applies the code at the checkout gets a discount equal to product X price.
Effects
Effects for unit discounts aren't supported in the plugin yet. It means that no matter what effect you are going to choose, the discount is always applied the same way as described in the Checkout section.
Installation
To start with, log into your WooCommerce account and follow these steps:
- 1
-
Go to the Plugins and choose Add New.
-

- 2
-
Search for Voucherify plugin

- 3
-
Click Install Now.
-

- 4
-
After installation, select Activate.
-


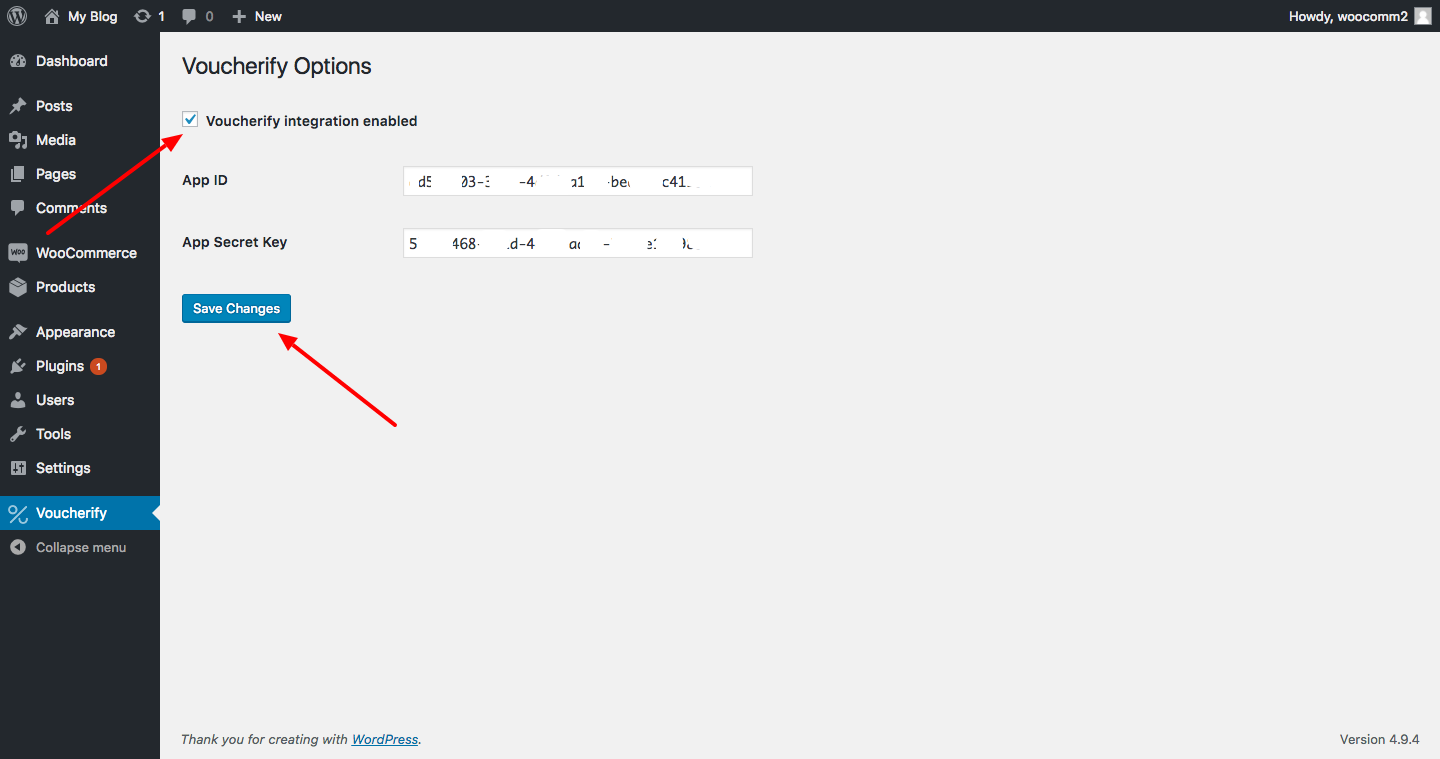
Configuration
When the plugin is active, you can connect both accounts in four simple steps:
Copy your Application ID and a Secret Key.
Enter your WordPress account and select Voucherify.

Use Voucherify coupons on your WordPress site
Now, your visitors can redeem Voucherify coupon codes to get a discount while shopping on your WordPress site. The workflow looks as follows:
- 1
- A customer selects products to add to their cart.
- 2
- In a cart summary, they can see a field for a coupon code.
-

- 3
- The customer enters a Voucherify code, and after choosing the Apply coupon, their order is automatically updated.
-

Applied discounts are also visible on a checkout page and order summary.
-
 Order summary after applying a Voucherify coupon
- 4
-
You can see redeemed coupons in your WordPress dashboard. Go to the Orders section and choose which order you'd like to display.
-


 Order summary after applying a Voucherify coupon
If any coupon has been applied, you'll see it in the details

Synchronize
The Synchronize button synchronizes all products, SKUs, customers, and orders that have not been synchronized yet. The resources that have already been synchronized are skipped in this action.
Remember that under normal circumstances, all resources are synchronized automatically when they are created or edited. Synchronize your resources if:
- You have resources in your WooCommerce platform and you have just installed the Voucherify plugin.
- You have temporarily disabled the Voucherify plugin and added new resources.
- The API has been temporarily unavailable.
- You have added resources manually to a database and not through Wordpress or WooCommerce.
Resynchronize All
The Resynchronize button synchronizes all existing products, SKUs, customers, and orders, including those that have been already synchronized.
Resynchronize all your resources if:
- You have a WooCommerce shop integrated with Voucherify, but you have changed the Voucherify project and you need to add your resources to a new project.
- There have been issues that caused resources to be marked as synchronized, but they are not present in Voucherify.
Cart-level promotions
Besides the coupon campaigns, you can use Voucherify cart-level promotions on your WordPress site.
- 1
-
Firstly, create promotion tiers and define rules in the campaign manager ( read more details here).
- 2
-
While shopping, users can see current promotions defined in your Voucherify account.

- 3
-
If a cart meets the required conditions, a user can see a box with available promotions. By choosing Apply promotion, the cart is automatically updated following the promotion rules.
If more than one promotion is available for a single cart, users need to select which one they would like to apply during the purchase.
-

- 4
-
Similarly to the coupon codes, you can see applied promotions in the WordPress dashboard.


Tracking your performance
Once the plugin is configured, you will be able to use coupon codes, gift vouchers, referral codes, promotions, and loyalty cards. For more tracking data, you can visit the Voucherify dashboard. In the Redemptions and Customers sections, Voucherify collects and presents detailed up-to-date information. You can read more about tracking in this guide.
WooCommerce Custom Snippets
Without any additional development work, the plugin itself provides a set of features that you can work with. You can extend the capabilities of the plugin by adding custom scripts to WooCommerce.
With these scripts you can, for example:
- Synchronize customer creation (described in this document)
- Synchronize orders, allowing your customers to gain points for making a purchase (described in this document)
- Get balance on Loyalty Cards (described in this document)
- Show your customers unique coupon codes in a popup using the Create Publication API call
- Show the list of vouchers for a single customer using the List Vouchers API call
- And many more!
Please refer to our API reference to get the most out of Voucherify.
This tutorial will provide the details on how to introduce custom scripts to WooCommerce. These scripts will allow you to use Voucherify’s API with no development work required. However, please note that supporting complex cases will require some development assistance.
Code snippets
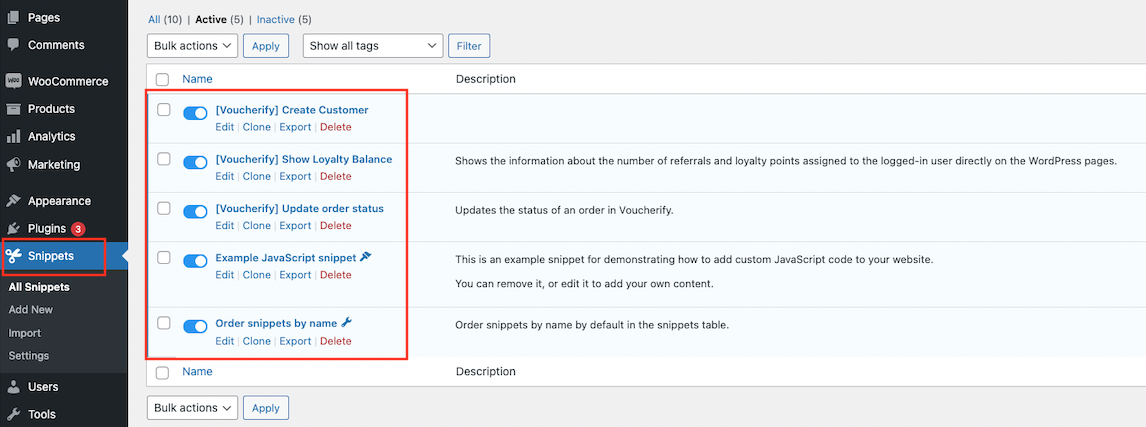
While there are a couple of ways to introduce custom code to WordPress and WooCommerce, we will use the Code Snippets plugin available from the WordPress marketplace. You can download it using this link.
Once the Code Snippet plugin is installed, you will have the option to add your snippets.
Creating a custom script
In this part of the tutorial, we will provide the details on how to add your custom code in WooCommerce. To introduce a custom script, you need to define when this script should be run and the outcome of the script. When a specific action is taken in WooCommerce, the custom code is triggered and we will explain how this action will affect Voucherify.
WooCommerce hooks
Hooks in WordPress essentially allow you to change or add code without editing core files. They are used extensively throughout WordPress and WooCommerce and are very useful for developers.
There are two types of hooks: actions and filters.
- Action Hooks allow you to insert custom code at various points (wherever the hook is run).
- Filter Hooks allow you to manipulate and return a variable which it passes (for instance, a product price).
To add an action to your hook, use the following code:
add_action('action_name', 'your_function_name');
function your_function_name()
{
    // Your code
}
To hook your custom code to an action, you need to define the action that should trigger your script. You can view the list of all action hooks under this WooCommerce documentation.
We will provide an example of synchronizing orders between WooCommerce and Voucherify. In our case, we use the woocommerce_order_status_changed action hook, but the hook might be different depending on your cases.
add_action('woocommerce_order_status_changed', 'synchronize_orders');
function synchronize_orders($order_id)
{
    // Your code
}
The documentation states that the woocommerce_order_status_changed hook returns the order_id. Therefore, we will use the order_id to get the status of the order later on.
You can learn more about the idea of action hooks in WooCommerce’s documentation.
Code snippets tutorial
This part of the tutorial will focus on the script itself. The script will have to connect to Voucherify using an API call.
To send out an API call from WordPress, you need to use the wp_remote_post function documented under this link. This method contains two arguments:
- $url - URL to the API endpoint
- $args - Request arguments.
One of the arguments is going to be the payload of the POST request. You need to align the payload to the API requests noted in Voucherify’s API reference. In our case, we are going to use the Create Order API call.
Here is the payload providing the customer and the amount he needed to pay.
$body = [
    'source_id' => $order->get_id(),
    'customer' =>  array(
        'source_id' => $order->get_customer_id(),
    ),
    // Voucherify requires the amount in cents.
    'amount' => $order->get_total() * 100,
    'status' => $status,
    'metadata' => array(
        'origin' => 'WooCommerce'
    )
];
$body = wp_json_encode($body);
The API calls sent to Voucherify must contain your API keys. To get the keys, you can find them in your project settings.
You provide the API keys and the previously created body to the $args array:
$args = array(
    'method' => 'POST',
    'data_format' => 'body',
    'headers' => array(
        'Content-Type' => 'application/json ',
        'X-App-Id' => 'API key',
        'X-App-Token' => 'API token'
    ),
    'body' => $body
);
The $url is the URL link to the API method:
$url = 'https://api.voucherify.io/v1/orders/';
Finally, you can send the request:
$response = wp_remote_post( $url, $args );
Example snippets
Synchronize orders
This code snippet will synchronize orders between WooCommerce and Voucherify. It will synchronize only the customer who is making the purchase, the status of the purchase, and the amount of the whole cart.
add_action('woocommerce_order_status_changed', 'synchronize_orders');
function synchronize_orders($order_id)
{
    // Get the order status
    $order = wc_get_order($order_id);
    $status =  $order->get_status();
    if ($status == 'completed') :
        $status = "PAID";
    else :
        $status = "CREATED";
    endif;

    // Get the newly created user data
    $body = [
        'source_id' => $order->get_id(),
        'customer' =>  array(
            'source_id' => $order->get_customer_id(),
        ),
        // Voucherify requires the amount in cents.
        'amount' => $order->get_total() * 100,
        'status' => $status,
        'metadata' => array(
            'origin' => 'WooCommerce'
        )
    ];
    $body = wp_json_encode($body);
    $url = 'https://api.voucherify.io/v1/orders/';
    $args = array(
        'method' => 'POST',
        'data_format' => 'body',
        'headers' => array(
            'Content-Type' => 'application/json ',
            'X-App-Id' => 'API key',
            'X-App-Token' => 'API token'
        ),
        'body' => $body
    );
    $response = wp_remote_post($url, $args);
}
Synchronize customers
This code snippet will create a customer in Voucherify once a customer is created in WooCommerce.
/* This code is run after a user (regardless of the role) has been created */
add_action('user_register', 'create_customer_in_Voucherify');

function create_customer_in_Voucherify($user_id)
{
    // Get the newly created user data
    $body = [
        'source_id' => $user_id,
        'name' => $_POST['first_name'],
        'email' => $_POST['email']
    ];
    $body = wp_json_encode($body);
    $url = 'https://api.voucherify.io/v1/customers/';
    $args = array(
        'method' => 'POST',
        'data_format' => 'body',
        'headers' => array(
            'Content-Type' => 'application/json ',
            'X-App-Id' => 'API key',
            'X-App-Token' => 'API token'
        ),
        'body' => $body
    );
    $response = wp_remote_post($url, $args);
}
Show loyalty balance
This code will show how many points the customer has. The HTML should be styled. To use the “GET” HTTP method you need to use the wp_remote_get function.
add_action('storefront_before_content', 'show_Voucherify_balance');

function show_Voucherify_balance()
{
    $user_id = get_current_user_id();
    $url = 'https://api.voucherify.io/v1/customers/' . $user_id;
    $args = array(
        'headers' => array(
            'Content-Type' => 'application/json ',
            'X-App-Id' => 'API key',
            'X-App-Token' => 'API token'
        )
    );
    $response = wp_remote_get($url, $args);

    $json = json_decode($response['body']);
    echo '<div id="credits"><h2>Hello ' . $json->name . '</h2>';
    echo '</div>';

    echo '<div id="credits"><h2>Number of credits:' . $json->summary->redemptions->gift->amount_to_go . '</h2>';
    echo '</div>';

    echo '<div id="referrals"><h2>Loyalty points: ' . $json->summary->redemptions->loyalty_card->points_to_go . '</h2>';
    echo '</div>';

    echo '<div id="referrals"><h2>Number of referrals: ' . $json->loyalty->referred_customers . '</h2>';
    echo '</div>';
}
Troubleshooting
There are a couple of issues you can encounter while working with these scripts. This section explains how to debug your scripts and find the issues.
Code Snippet's safe mode
Your code can crash the site. In some cases, you might even lose access to the dashboard because your code has a bug that crashes every time you log in. Code Snippets team provides a safe mode that helps in that case.
You can learn more about the safe mode under this link.
WooCommerce logs
Logs can be found on the dashboard of a site. To view the logs:
- Go to WooCommerce > Status
- Click on the Logs tab
- Choose a log from the drop-down
Voucherify logs
If you want to know how Voucherify reacted to the request, you can find that information under the Project Logs in Voucherify.
You can access Voucherify’s logs by following this tutorial.