Discount Cheapest or Most Expensive Items
Voucherify campaigns can be applied to the whole cart or to selected items. You can discount particular product collections and on top of that apply discounts only to the cheapest or the most expensive items. In this guide, you will learn how to set a discount on the cheapest or most expensive item in the customer's cart.
Contents
- Discount the cheapest/most expensive items.
- Create redemption limits for the cheapest/most expensive items.
Discount the cheapest/most expensive items
To discount the cheapest/most expensive items, you need to choose a respective discount effect when creating a campaign. Selecting discounted/excluded items is a part of the validation rules setup.
Step 1: Apply discount to items
After defining the discount type and value, choose to apply the discount to specific items.

Step 2: Select discounted items
Choose to discount Selected items and add items to define which items will be included.

- Select existing products from your list.

- Create a product collection(s) that defines what criteria items have to match to qualify for a discount.
- Choose an existing product collection(s).

- Choose the built-in collection All Products. This collection gathers all products provided in the customer's cart without any additional filters.


Step 3: Apply discount to the cheapest/most expensive item
After choosing products or collections, you can decide if the discount will be applied to all qualified items or only to the cheapest or most expensive of the qualified products.
Note that you can add another component defining discounted items and combine many effects. For example, the discount can be applied to the cheapest and most expensive product in the cart.
Likewise, you can use the same methods to define excluded products. As a result, the discount won't be applied to the selected items.
Create redemption limits for the cheapest/most expensive items
Besides discounting or excluding the cheapest/most expensive items, you can set additional validation rules that need to be met by the cheapest or most expensive items. As a result, chosen item(s) will be validated against pre-defined limits when redeeming the discount.
To access rules, you need to use the Advanced rules builder.

Expand the order structure category. 
You can see the rules dedicated to the cheapest or most expensive items. 
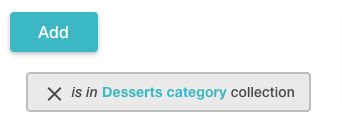
Choose the rule and click Add. Next, choose if you want to set rules for the cheapest/most expensive item in the cart or for the cheapest/most expensive item in the cart that belongs to a specific product collection.
- By choosing All Products collection, the validation chooses the cheapest/most expensive of all items in the cart.

- By choosing a specific collection created with product filters, for example, "Desserts category", the validation chooses the cheapest/most expensive item in the cart that belongs to the chosen collection.


You can define the following limits for the cheapest/most expensive item:
- Subtotal of matched items – the total amount of all qualified cheapest/most expensive items.
- Quantity of matched items – the total count of all qualified cheapest/most expensive items.
- Items quantity in any matching order line – this rule defines the required quantity of each qualified cheapest/most expensive item.
- The unit price of any matching order line – this rule defines the required price of each qualified cheapest/most expensive item.
- Metadata of matched items - build limits using order line item metadata. Rules need to be met by each qualified cheapest/most expensive item.